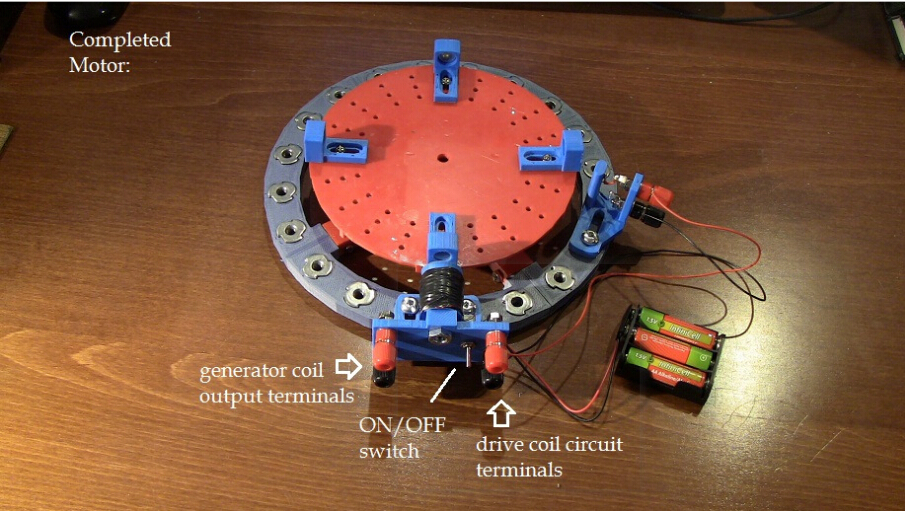
How to Assemble Permanent Magnet Motor?
This magnet assembly kit contains powerful permanent magnets. Exercise caution when handling them as they can pull on iron tools and snap together with significant force if brought together. Also, keep magnetic field sensitive cards and devices away from the NdFeB magnets. Assembling the motor: The motor comes pre-assembled and pre-wired with the 4 neodymium ring magnets in position 90 degrees apart, but requires the placement of the stator coil and reed switch in the desired positions on the outer ring. The assembled parts are shown in as follows:
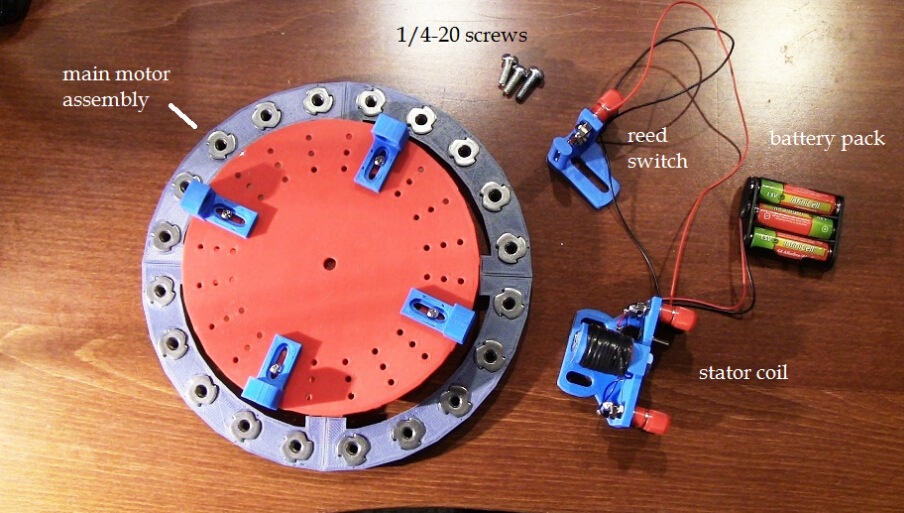
These are:
1) The main motor assembly, which includes the magnet rotor, the stator, and the mounted magnets/magnet holders.
2) The stator coil assembly, with its on/off switch.
3) The reed switch assembly.
4) The battery pack (shown with 3 AA cells, not included).
Step 1: Mounting the stator coil.
The stator coil should be placed first, and can be mounted in any position on the stator portion of the main rotor assembly. The stator coil has two oval holes in its base that can be positioned over two of the stator screw holes.
Step 2: Positioning the reed switch:
Once the stator coil is in place, you can then position the reed switch. The position chosen for the reed switch depends on which way you would like the motor to rotate. To operate the motor, simply place the ON/OFF switch in the ON position (up) and give the rotor a gentle push in the chosen direction (clockwise or counter-clockwise). If the reed switch position is chosen carefully, the motor can be self-starting. It will then rotate up to speed in a few seconds, which depending on the placement of the parts will be about 150-250 RPM at 4.5VDC.
 The motor works as follows:
1) The permanent magnet closest to the stator is attracted to the iron core until it reaches a position directly opposite.
2) At this moment of closest approach, the reed switch is activated by the magnet in the 3 o’clock position, changing its state from open to closed.
3) This energizes the stator coil with the same magnetic field polarity as the magnet facing it at the 6 o’clock position, leading to repulsion. Since the magnet is already in motion, it is propelled in the same direction that it is already rotating.
4) The reed switch then opens. As it does so, the magnetic field of the stator coil collapses, inducing a secondary transient electrical pulse in the generator coil.